
INTRODUCTION
Because of its dominant position in the industry, Apple inevitably takes a novel approach to problem solving. The Apple iPhone has every feature that consumers might want in a mobile phone, and then some. That is to say, features are there, but getting to them may take some doing. An iPhone makes it simple for novices to snap a screenshot, but beginning a screen recording can be trickier. Screen recording on an iPhone is as easy as taking a screenshot or making a call, provided you know how to activate the feature. This post will teach you how to record the display on your iPhone, as well as how to modify and share the resulting video.(How To Screen Record On iPhone)

If the built-in iOS screen recorder is sufficient for your needs, then you don't need anything else. You may record audio with the iPhone's built-in screen recorder and even share content from other applications like WhatsApp, Telegram, and more.
How to Record Your iOS Device's Screen
The first thing you need to do is activate the screen recorder in your iPad's or iPhone's settings.
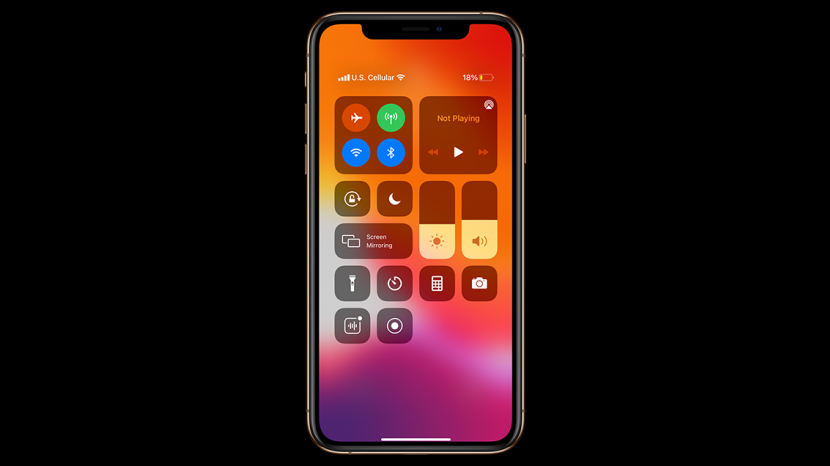
On an iOS device, Control Center can be accessed through the Settings menu.
Step 2: Finding Screen Recorder is the first step; then, tap the "+" button on its left. It's been moved to the "Included Controls" section.
Third, launch the device's configuration screen.
When using an iPad or iPhone without a home button, swipe down from the screen's top right corner to activate Control Center.
Swipe up from the bottom of the screen while holding down the Home button on an iPhone or iPad to bring up the Control Center.
Hold down the Record button and pick the Microphone option to begin recording. If you don't want to record audio, you can turn off the microphone symbol.
The third stage is to start taping. Your recording will start after a three-second pause.
Take note: • The built-in screen recorder will automatically save your footage to the Photos app on your device. The recording can be exported and then imported into other programs like Facebook Messenger, Telegram, and many others.
Without your intervention, the built-in screen recorder will record all on-screen activities, including notifications.
- The "Airplane" mode (Settings app -> Airplane) and the "Focus/Do Not Disturb" option will both prevent notifications from displaying during screen recording.
To stop recording, tap the red status bar at the top of your screen and select Stop from the resulting menu. You can also go to your iOS device's Control Center and hit the red "Record" button there to stop a recording.
Siri Screen Recording Guide for iOS Devices
This is the newest and most convenient method of screen recording available to iPhone users. Siri may now be used to instantly start and stop a screen recording on an iPhone, a capability introduced in the beta version of iOS 16.5. This article explains how to record the screen of your iPhone using Siri. –
Saying "Hey Siri" or pressing the iPhone's side button will activate Siri. Saying "Hey Siri, begin screen recording" is all that's required. A simple command like "Hey Siri, record my screen" or "Hey Siri, screen record" will start the recording.
SEE ALSO : Search Engine Optimization (SEO) for Jewelry & Diamonds
On an iPhone, there is no delay before recording starts.
Once you've started recording, you'll see a "Red" screen recording indicator in the Dynamic Island (iPhone 14 Pro and later models) or in the top right corner of your iPhone's home screen.
Using the command "Hey Siri, stop screen recording," you can halt a recording that is currently playing.
Five, you can manually close the pause screen if you like. When the "Red" screen recording indicator is tapped, a pop-up will appear from which you can choose "Stop" to end the recording.
The recorded video of your screen will be placed in the "Photos" folder when the recording is complete. In subsequent chapters, we'll discuss how to edit and share the recorded footage to suit your needs.
A generic command like "Hey Siri, take screen recording" will result in Siri taking a screenshot rather than beginning a screen recording on the iOS 16.5 beta.
Using a Mac to Record Your iOS Device's Screen
QuickTime Player for macOS's screen recording features on iPhones have been widely publicized for some time. For this reason, Mac users will get the most out of this powerful software if they choose to use it on their computer. You won't look like an amateur because, for starters, the "Red" recording button is hidden. Screencasting in higher quality is possible also, which is extremely useful for creating instructional videos or presentations.
To begin, connect your iOS device to your Mac and launch QuickTime Player.
Then, in the top left of the screen, go to the File menu and pick New Movie Recording.
Select your iOS device from the list that appears next to "Camera" after clicking the down arrow next to the record button. To use the system's microphone, choose that option. If you want a high-quality recording of the screen, you should also set the Quality to High.
What you see on your phone will now appear on your Mac. The record button initiates recording. To stop recording and download the video to your smartphone, press the red record button.
Capturing Your iOS Device's Display Using a Windows-based Personal Computer
It's a pain to record the iPhone screen on a PC because QuickTime Player isn't compatible with Windows. Because of this, if you want to record the screen of your iOS device on your Windows PC, you'll need to utilize a third-party program.
The programs "LonelyScreen" and "AirServer" come highly recommended as options for this endeavor. You may easily record your screen activity using LonelyScreen, a free program. If you're looking to record high-quality video of your screen while maintaining fine-grained control, AirServer is your best bet.
We have a separate guide on how to record the screen of your iPhone if you're using Windows. If the need arises, refer to the user guide.
Record Your iOS Device Screen, Then Edit And Share It
The stock picture app has been updated with powerful new tools for altering photos and videos. Thus, you can enhance your video using the program's in-built editing tools.
Start the Photos app and go to the video clip you want to edit. This may be done on any iOS or iPadOS device. Select the pencil icon located in the post's upper right corner to make changes.
Second, basic modifications like cropping and filtering are now available for your video. You can also adjust the brightness and contrast of the video to suit your preferences. Don't forget to hit the Done button at the very bottom right of the screen when you're done making adjustments to the video.
Third, tap the Share button and then pick the app you want to use to send the recording to.
The Top Third-Party iOS Device Screen Recorders
Numerous screen recorders for the iPhone and iPad can be found in the App Store. However, I've found these two apps to be the most useful.
Remember this!
Take notes! may be worth a shot if you're looking for a robust iOS screen recorder. What makes it stand out is the wide variety of editing controls it offers, such as the ability to change the clip's background color, adjust the clip's playing speed, crop the video, and rotate it. It also comes with a plethora of high-quality filters you can use to polish up your videos in no time. As soon as your movie is complete, you can share it on sites like YouTube.
Go Record
I've also had great success with "Go Record" when it comes to recording my screen. It records your screen when you use any app or game. Because of its robust editing tools, the program provides you the creative leeway you need to make your movie truly your own. Include a response captured by the camera in front of your face. When your video is complete, you have the option of uploading it to YouTube or keeping it on your computer.

Taking Screenshots of Your iPhone is a Breeze
There you have it: a number of easy options for capturing the screen of your iPhone. While the system's native screen recording capabilities are adequate for this task, we have also provided advanced options for those interested in taking their videos to the next level.
Guide to Recording Your iPhone's Screen
Nothing happens when I try to record the screen of my iPhone.
It's possible that you can't initiate a screen recording due to restrictions imposed by your iPhone's settings. The following is what needs to be done to fix this:
SEE ALSO : how to edit pdf file
Go to your iPhone's "Settings" menu, then scroll down until you see the "Screen Time" option, then tap it.
To view all of the stipulations that can be approved or disapproved, go to "Content & Privacy Restrictions" and then click "Content Restrictions."
Please see the bottom of this page to activate "Screen Recoding," if it hasn't already.
Is there a reason there's no audio in my screen captures?
It's possible the microphone wasn't turned on during screen recording, or that the program you were using didn't support audio recording.


