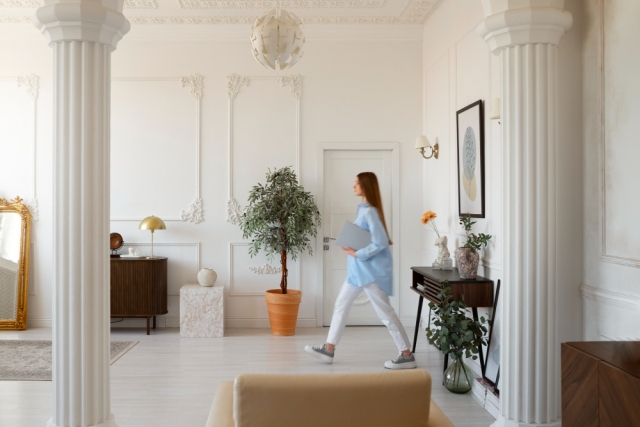
Wall trim moulding is a simple yet impactful way to upgrade the look and feel of any room in your home. Whether you want to add elegance, define spaces, or bring a bit of architectural detail to your walls, moulding does the trick. It's a flexible design feature that can complement both modern and traditional styles. Plus, it's relatively easy to install, making it a favourite among DIY enthusiasts and home renovators alike. In this article, we'll explore how you can use wall trim moulding to enhance your home's aesthetic while adding both charm and character.
How Wall Trim Molding Adds Depth and Texture to Walls
One of the main benefits of wall trim moulding is the dimension it adds to flat walls. By simply installing trim, you can break up large, blank wall spaces and create visual interest. This is especially useful for rooms with tall ceilings, as the right moulding can balance proportions and prevent the walls from feeling too empty or overwhelming.
Several types of wall moulding can enhance the texture of your walls. Chair rails, for instance, can separate different wall treatments, such as paint and wallpaper. Crown moulding, installed where the walls meet the ceiling, can add an elegant finish to any room. Picture frame moulding, which mimics the look of framed art, creates a decorative panel effect that adds architectural interest.
For those who want to go the extra mile, combining different types of moulding is an excellent choice. For example, crown moulding paired with baseboards or wainscoting can create a cohesive look that adds both height and depth to your room.
The Best Materials to Use for Wall Trim Molding
Choosing the right material for your wall trim moulding can greatly impact the look and durability of the finish. Wood is the most traditional and versatile option, offering a warm, natural appearance that works well in both classic and contemporary interiors. Depending on the style you want to achieve, you can stain or paint it. Wood moulding is also easy to cut and shape, making it ideal for custom designs.
For a more budget-friendly option, MDF (medium-density fibreboard) is a popular choice. It's easy to work with, takes paint well, and gives a smooth, polished finish. While MDF is less durable than wood, it works well in low-traffic areas or for projects where cost is a major consideration.
Another option to consider is polyurethane, which is lightweight, durable, and resistant to moisture. This makes it an excellent choice for areas like bathrooms or kitchens, where humidity levels are higher. It's also great for intricate designs, as it can be moulded into detailed shapes while maintaining a smooth finish. With so many material options, it's important to choose one that suits both your design goals and your budget.
Easy Installation Tips for DIY Wall Trim Molding Projects
Installing wall trim moulding can be a rewarding DIY project, especially if you enjoy hands-on home improvements. Before starting, gather the necessary tools, including measuring tape, mitre saw, adhesive, finishing nails, and a level. Measure the area where you plan to install the moulding to ensure you purchase the right amount of material.
Start by cutting the moulding pieces to the correct size. It's crucial to use a mitre saw to create angled cuts, especially for crown moulding and baseboards, which require precise corner joints. Dry-fit the pieces before securing them to the wall to make sure they align properly.
When installing, the adhesive can help hold the trim in place while you nail it down. Be sure to use a level to ensure your moulding is straight. If you notice any gaps, fill them with caulk for a seamless look. Finally, sand the edges and paint or stain the moulding to match your desired finish. With a bit of patience and attention to detail, you can achieve a professional-looking result without needing to hire a contractor.
Top Wall Trim Molding Styles for Different Home Décor
Selecting the right style of wall trim moulding can elevate the overall design of your room. Crown moulding, with its distinct profile, works well in traditional or formal spaces like dining rooms or living areas. Its curved or angular design creates a smooth transition between the walls and ceiling, adding a touch of elegance.
For a more modern, streamlined look, consider flat or minimalistic trim. This style avoids ornate detailing and provides clean, sharp lines that complement contemporary or mid-century modern homes. Picture frame moulding is another versatile option, as it can be arranged to create geometric patterns that suit both traditional and modern settings.
If you prefer a rustic or farmhouse aesthetic, shiplap or beadboard panelling paired with simple baseboards can give your home a cozy, welcoming feel. Shiplap works especially well in entryways, bathrooms, or kitchens, where it can add texture without overwhelming the space. With so many wall trim molding styles available, you can easily find an option that complements your home's unique personality.
Choosing Wall Trim Molding to Match Your Room's Function
Different rooms have different design needs, and choosing the right wall trim molding based on the function of each space is key to achieving the best result. For high-traffic areas like hallways or entryways, consider durable materials such as wood or polyurethane that can withstand wear and tear. In contrast, bedrooms and living rooms can benefit from softer, more decorative trim styles like picture frames or chair rail moulding, which add a touch of elegance without being overpowering.
In functional spaces like kitchens or bathrooms, opt for moisture-resistant materials such as polyurethane or vinyl to prevent warping or damage from humidity. You can also use trim to create focal points, like highlighting a backsplash or framing a built-in feature. By matching the type and style of moulding to the specific function of the room, you'll ensure that your trim not only looks great but also stands the test of time.
How to Paint and Finish Wall Trim Molding for Best Results
Once your wall trim moulding is installed, finishing it with the right paint or stain is essential to achieving a polished look. If you want the trim to blend in with the walls, paint it the same colour as the walls for a seamless effect. This approach is great for modern or minimalist spaces where you want the trim to be subtle.
On the other hand, if you want the trim to stand out, paint it a contrasting colour. For example, white trim on coloured walls creates a crisp, clean look that adds definition to the space. Dark-coloured trim can add drama and sophistication to a room, especially in spaces like a library or home office.
Before painting, be sure to sand the trim lightly to ensure a smooth surface. Use painter's tape to protect your walls and floors, and apply a primer before painting to achieve the best coverage. Whether you choose a glossy or matte finish, the right paint can enhance the look of your trim and make it a standout feature in your home.
Wall Trim Molding Brings Style and Function Together
Wall trim moulding offers homeowners a great way to add style and functionality to their spaces. Whether you choose a traditional crown moulding or a modern flat trim, there's a style that suits every home and budget. The installation process is simple enough for DIY enthusiasts, and with the right materials, your trim will look exceptional for years to come. When carefully planned and installed, wall trim moulding can transform the look of any room, giving your home the distinct finishing touch it deserves.


